Feeds:
Posts
Comments

Everyone always seems to chuckle whenever I suggest that they converse with their plants. The reality is I am absolutely serious!

Let’s go back to square one. When plants first appeared on our planet, they literally grew where they were planted. They were in the right place which supplied their every need. They flourished because all the stars were aligned to provide for their every wish.

At some point, a person came along who thought it would be nice if that root plant grew closer to where s/he lived, so they tried moving it. It grew, if perhaps not quite as well, so this person attempted to replicate its former environment creating the very first GARDENER! We are still doing that today. Our farmers are brilliant at that (MOST of the time). And of course, we gardeners try very hard to make our plants happy outside. We understand that there are limits. Some plants just will not flourish or even grow in some climates. But, it doesn’t stop us from bringing those plants INSIDE!

The thought is that we can provide for ALL their needs inside our homes. We can set them on a windowsill, or under a grow light and all should be well in paradise. Right? Well, maybe not…

.

The minute we pick up that pot and bring it inside our homes, we are becoming “The ALL Powerful” (Or whatever you choose to call it.) That means that you are assuming SOLE responsibility for that little piece of nature. It is now TOTALLY out of it’s element, and it’s up to YOU to provide for its every need.

But, what IS that need? Here is where you have to start listening and consequently talking to your plant. The talking starts by finding out what that little (or big) guy needs in the way of nutrients, water, and surroundings (pot and light). The listening begins when you see how that plant responds to your efforts. If it doesn’t look healthy, if it droops or drops leaves, or the leaves turn yellow, or the roots rot, obviously, you’re doing something wrong. It’s TALKING to you! You just have to begin to understand its language.

My next entries in this blog will go into further depth about talking and listening to your plant(s). If you’re interested in following along, go to the tab at the top of this page on the right-hand side. Give your email address, click “Follow” and you’ll be notified by email when the next upgrade of this blog happens. Thanks for joining!

Today’s “Plant Clinic” issue was a Peace Lily looking a bit bedraggled with a few brown edges on its leaves. When I looked more closely at it, it was quite dry. It was easy to remove the roots from the pot, and although they were white and quite healthy looking, there was not a whole lot of soil surrounding those roots.

There were a few things I suggested, beginning with the need for this plant to be better hydrated. It would probably be good to submerge the bottom of the pot in a tub/sink of tepid water allowing it to soak up as much water as it wanted. In the summertime, it is a good idea to give it a bit of plant fertilizer which is dissolved in the water. The pot could be left in the water for 20-30 minutes or so. When removed allow the pot to drain before putting it back into its cover pot. The roots, although they need water, should NOT stand in water! Water it only when the soil becomes dry about an inch below the surface.

These plants also love to have occasional misting. If you have a little”spritzer” you might spray them once a week in the summer.

The other thing to remember is that the Peace Lily is not crazy about sunshine! They normally grow, in nature, below a tropical canopy where there is shade and very organic soil from deteriorating plant material. When grown in a home, they can handle a bit more sun. If you overdo the sunshine they will respond with yellowing and curved leaves. Should this happen to your plant, move it to a shadier spot.

Here’s a picture of a beautiful Peace Lily, just so you know what you should be aiming for!

If you’d like to read a bit more about the care and growth of Peace Lilies, I think this website would be quite helpful!

https://www.wikihow.com/Care-for-Peace-Lilies

Joan brought her Calla Lily down to B-1 where a few of us awaited her appearance. She did not disappoint. We were soon deep in a discussion about why the tips of her Calla Lily were drying and turning brown.
I handed out some information sheets on Calla Lilies. If you’re interested in seeing it visit this website. https://www.houseplantsexpert.com/growing-calla-lilly-plants-indoors-and-care.html.

We talked about the fact that the soil should be damp at all times when keeping a Calla Lily indoors. Joan’s soil for her lily appeared to be perfect, so it couldn’t be that. The soil was neither dry nor overly wet (no water at the bottom). It looked just fine except for those yellowing, drying tips of the leaves.

We talked about the pH level of the soil which the Calla Lily needs for flowering. Perhaps it was the amount of light received, the temperature of the apartment, or even the humidity level of the room. Her window faces north which is not great, but it does get sun.

It was suggested that perhaps standing the pot on gravel with water would help the humidity level, as long as the water did not reach the bottom of the pot, as it should NOT stand in water. That standing water would help humidify the plant.

We then removed the root ball from the pot. The plant was heading toward being root bound, but that should not really be an issue at this point. However, there were a few little rootlets that appeared to be unhealthy (brownish). I suggested that they be trimmed. I also suggested that she do a little root trimming. It would not hurt the plant, and would make a bit more room in the pot!

While the root was out of the pot, we suggested that she re-pot it with fresh potting soil. It is often suggested that soil be removed from the roots in a pail of tepid water when repotting. That is not practical where we live, as the pipes would not appreciate the addition of soil. However, as the weather warmed she could certainly take the plant outside and accomplish this with a gentle hosing of the rootball. But, until then, just gently removing the soil from the roots and re-potting it would be a good exercise.

We ended up our session with a discussion of rhizomes and what exactly they were. We were familiar with the rhizomes on irises which sit horizontal to the leaves. On looking them up we could see that rhizomes could also be carrot shaped, small, and not entirely what you’d expect them to look like. Check out this website for a thorough explanation with pictures! https://www.thespruce.com/rhizomes-2131103

As the leader of this new group, I learned a few things. I must remember to bring my laptop for immediate explanations. My phone kind of worked, but not really as well as the laptop. I should also remember to bring my little pruning “snippers”. I used newspaper to set the plant on, but I think a larger cheesecloth tablecloth might work better.

It was suggested that next time we talk about Orchids. I often get questions about these “lovlies” so that would probably be appropriate.

The other day I went downstairs to the “Potting Room”. I live in a Retirement facility and one of our perks, among others, is a Potting Room. It is where we can take our pots and do some re-potting, or potting up for the first time. Those of us with indoor plants LOVE this room. Whatever we need is there for our use, as long as we keep the room clean and inviting.

The biggest boon is the huge barrel of Potting Soil. However, the other day when I went to get some soil for my pot and opened the barrel, it was filled with GARDEN SOIL! Uh, oh! I used it as it was the only soil available, but it is definitely not the soil of choice for our indoor plants. So WHY NOT?

There are various types of soil. Let’s see what they are and how we, as gardeners, use them. First remember it is SOIL, NOT DIRT! Soil is where you plant things. Dirt is that stuff you wash off your boots, or stamp off your shoes, and wash your hands and scrub your fingernails to get rid of!!! Remember the distinction! So, there are different TYPES of soil??? Sure…let’s talk about that.

Plain old soil we find outside when we plant our bulbs, plants, shrubs and trees. It has what nature, or the previous land owner, put there. We’ll find stone fragments, worms, soil, and Lord knows what else there, along with air and water.

Garden Soil is what we generally buy to add to our garden in order to make it look, and be, healthy. As this University of Maine Bulletin indicates, this is a complicated term!

We can also avail ourselves of COMPOST. Compost is a mixture of organic matter, as from leaves and manure, that has decayed or has been digested by organisms. It is used to improve soil structure and provide nutrients. Compost can be generated in the garden, or purchased. If you’d like to try doing it in your home garden, here are some good composting ideas for you to pursue suggested by Penn State University Extension. (With a picture of compost from Cornell Extension Service.)

Potting Soil is used exclusively in pots for indoor plants, or pots you may keep on your deck, or even pots in the garden. Potting soil is lighter in consistency and weight (making it easier to move around, among other things) and often does not even have any soil (as we know it) involved at all! If you are really interested in finding out more click here! Potting Soil is quite different from Garden Soil! Here’s a photo of what it looks like. You can see the grains of vermiculite, etc.

There are other types of soils, but they are more than we need to discuss here. I hope I’ve clarified a few that we really USE in our garden or window-sill.

For those of you living in the Pacific Northwest, it looks like we’re in for a terrible heatwave!

Your plants will not be able to move into a nice air conditioned space. They have no way to move into the shade, unless they are already there. And they certainly will not be able to go to the fridge, grab a cold one, and sit down to relax where it’s cooler!

Remember them? You put them where they could take advantage of the sun. This weekend that will be a terrible location for them. What can you do?

You are the gardener. You are the one to keep them not only alive, but thriving. Over the next few days (or week) they will need to have WATER! And LOTS OF WATER!

Most of the places you will “google” will tell you to be careful of watering in the morning or the middle of the day, because it will burn the leaves. But, if you water at night, the leaves won’t dry out and will develop mildew. But, wait a minute. It’s not the leaves that need the water…its the roots!

The story here is, it doesn’t matter WHAT time of day you water the roots…just DO it! The trick is to just plain SOAK the garden. Set the hose on a gentle stream (so it doesn’t wash away the soil) and set it at the base of the plant for 10-20 minutes or so depending on the size of the plant. Let that water just soak down to the roots. Then move onto the next plant.

If you have potted plants in the garden, they’ll need extra, because they will dry out a lot faster as well. Just fill that pot up with water, and revisit it with the hose as needed.

Remember, this process will take awhile, which is why sometimes it’s just easier to let the hose run by itself while you busy yourself elsewhere!

This is why soaker hoses are so useful. Just turn them on and leave them for awhile!

I have spent the last 15 minutes trying to find a photo of someone soaking their garden-impossible! The are ALL spraying the plants…Do not do that. Instead, SOAK THOSE ROOTS!

The other day, one of my friends asked why our gardens were looking so colorless.  I said I thought it was probably because the flowers were between spring and summer, and just be patient.

Then, I went down to visit my garden, and YES!  My friend was right.  When I looked with a critical eye, she was correct…very little color and lots of height and just plain “scruff’.  I walked slowly looking at each garden carefully.  I have made a few observations, which the Master Gardener in me would like to share with you here.

First, there was no “June In Our Gardens” last year.  That was a time that promoted a sense of pride and excitement about our gardens.  Everyone knew their name was announcing whose garden folks were looking at.  So, we ALL took particular care of our  plantings.  We trimmed, we pruned, we fertilized, we mulched, we planted and we moved stuff to a better place.  How many of us have done that this year?  From the look of things, not too many of us.  We’ve gotten a bit lax.  

Now, Sunny Mondays are beginning.  AND, we will have our big picnic in July. Our gardens will be on full display.  Many of the attendees enjoy walking down our “garden path” and checking out our gardens. It’s up to us to make that stroll one of admiration and enjoyment! *Sunny Mondays, by the way, are Monday evening’s in the gardens with our beverage of choice and a shared snack. They are wonderful social events!

So what to do?

  • Stand back and take a very critical view of your garden!
  • Where are the dead blooms?  The ones needing desperately to be dead-headed.  Clip those blooms off.  BUT, remember when you prune to take that stem down either to the main stem, or even to the ground-depending on the plant.  But, be on the lookout for other new little flower buds and be sure to leave them! Here’s a wonderful site explaining just how to do this…with pictures! https://www.fiskars.com/en-us/gardening-and-yard-care/ideas-and-how-tos/pruning-and-trimming/deadheading-flowers
  • Once a plant is finished blooming it puts its energy either into making seeds, or strengthening the roots (or leaves).  I don’t think ANY of us are trying to develop seeds for next year’s plantings, so snip those spent blooms OFF!  When those seed heads are gone, the plant can concentrate on roots and leaves.  (There are of course, some plants that have beautiful seed heads…you decide if they should stay!)
  • There are some plants that have tall, straggly stems with a bloom or two at the top.  Is that what you want?  If not, cut those way down…maybe leaving a rosette of leaves at the bottom.
  • Any spring blooming bulbs can probably be cut back now.  Usually you wait until they have died back.  If yours are still green, leave them for a bit longer, but it they are looking sorry…it’s probably time to cut them back! Here’s another link with wonderful directions, also with pictures. https://www.thespruce.com/when-can-i-cut-browning-leaves-1402237
  • If you know the names of the plants in your gardens, label them.  People love to be able to identify the plants they are looking at.
  • Do some weeding.  Even in our gardens where we tend to use sterile soil, birds and little critters will still bring in weed seeds.
  • And since we’re mentioning weeds…What exactly IS a weed?  It is ANYTHING growing where you do NOT want it!
  • So, there you have it.  Let the gardening spirit come screaming out, grab those pruners (etc.) and tackle those gardens.  I guarantee you’ll LOVE what you see when you finish!

 Here’s to delightful and colorful gardens at Horizon House!

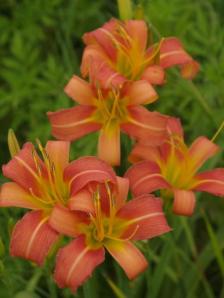
Dayliles belong to the genus Hemerocallis, a Greek word meaning “beautiful for a day”.  AND that they are!

Here is a picture of the small daylily I have in my garden.  I specifically got small ones, so their flowers are at the level of the other blooms that surround them. This one was photographed just as it was beginning to present me with flowers!  If you look carefully, you can see other buds peeking in among the hosta leaves behind it.

Daylilies come in different sizes, both in height and size of bloom, although generally the taller the stem, the larger the flower.  I must say, my smaller (shorter) plant has blooms that are pretty close in size to the larger daylilies I’ve had in the past. You can find them with about 15 inch stems, like mine, to ones towering to four feet!  The flowers themselves can be found from three to eight inches across!!! Colors vary from the common yellow to exotic colors that seem to change year to year. Look for what will fit specifically into YOUR garden.433863_130129193231_PC264705_PEACH_BLEND_

Daylilies should be in EVERY garden!  They are easy to plant; easy to care for; very pretty; and they multiply by careful spreading.  They don’t get out of control, or pop up in places you don’t want them.  They don’t need to be watered much, and seem to bloom FOREVER!

The only thing you should do with them, is to remove the spent flowers.  They are called DAY-lilies for a reason. They will bloom, and the bloom will whither, all in a day or so.  IF you don’t remove that spent bloom, it will fall off all by itself after about a week.  However, the plant looks much better if you don’t have to look at withered blooms, so pick them off when you see them.

If you’re off on a vacation or something, don’t worry about the daylilies, they will continue to make your garden look just wonderful!

It sounds like the plant will be all gone after a day, but these guys have MANY buds on at least one stem per plant.  As they age, the stems multiply and the blooms will come, and come and come.F021AF87-9333-4EF2-8B6D-5EABC0E9127C_1_105_c

The only real care that should be given is to prune off the stems after all the blooms are done.  They will look unsightly, and are not needed by the plant.   Also, these lilies need very little extra attention. However, they will appreciate a dose of compost every spring.  As you layer the rest of your garden with compost, don’t forget the daylilies.

Here is a very extensive link about planting, care, and anything else you might want to know about daylilies from the University of Minnesota Extension Service.  

The planting and care instruction given at this Minnesota web-site can be utilized where-ever daylilies are planted and grown.  Once you’ve had these wonderful plants in your garden, you’ll never garden again without them!

This morning, I went into our gardens to do a little filming, in order to make a video of our own gardens for our “Virtual June In Our Gardens”.  It was an eye-opener.

Most gardeners need to give their gardens a good, objective look!  What I saw was a LOT of plants that were needing to be dead-headed.

The bulbs are done, and most of you are watching the leaves die back…which is the right thing to do, as those leaves give the bulbs nutrients for next years blooms.

BUT, there are many early, spring-blooming plants that have finished their “show”.  Be sure to trim those flowers off.  What they are doing now is developing seeds.  Unless you want the seeds, that is hard work for the plants.  They will put all their energy into making seeds, and the plants will soon look pretty “seedy”-pun intended!  This is probably where that expression came from. When you trim them, make your cut as close to the main part of the plant as you can.  This may be a branch, or even right to the ground, depending on the plant.

Then there are all those tall irises. With the rain, they are either bent over, or “gone by”.  If you carefully bend the spent bloom back toward the stem, it will come out leaving the stem and a newer bloom there ready to look pretty nice! You’ll need to support the stem as you do this, or you will break it.  If the iris is really tall, you may need to stake it.  Remember that for next year.

Have you got a Peony?  They are in the midst of their blooming.  If a bloom is done, trim it back to the next nearest cluster of leaves.  Don’t leave any empty stems.  They look pretty UGLY!  Stand back and look at the plant.  You might need to balance it out a bit.  That’s easy to do, just take those pruners and trim out the leggy branches to a good spot, by a junction of stems, so you avoid those “sticks”.

I must say, I’m getting a bit claustrophobic!  Gardeners all over are finding respite and comfort in their gardens.  They are getting fresh air and staying healthy.  They are not spreading germs, but perhaps becoming a bit of compost instead.

Here in Horizon House, however, we’re stuck in our apartments.  We cannot get into our gardens.  All we can do is laundry and empty garbage!  Thrilling, right?  We are all so READY to get back to greeting each other. AND get into our gardens.  It feels like the rebuild of the West wing, when we were not allowed in our gardens for a year!

What we found was that nature really does know how to take care of itself.  Granted a few annuals became composted in place, and a few plants suffered, but came back as soon as they received a little extra TLC.  So, fear not, your gardens await you, just like you await them!

Screen Shot 2020-04-10 at 11.50.44 AM

I thought I’d look to see if I could find some gardens for you to tour virtually.

The one of the Kew Gardens is delightful.

Or maybe you’d like to learn a bit more about Monet’s Gardens.

And finally, the magnificent “Gardens at Waddesdon Manor“.

I hope you enjoyed them!  It’s not quite as good as digging in your own dirt, but they sure are pretty!

And we’re stuck inside with very little to do.  Those who have homes with gardens are in good shape.  You can go outside and garden to your hearts content.  However, those of us who live at Horizon House, or other Retirement Communities, are confined to staying in our rooms, or sequestered in some way.    IMG_0052

So, I’ve been wondering how to let our gardening spirits gambol about. IMG_7628Here are some ideas for your hours of boredom.  Some of these ideas are really kind of cute. Others, kind of interesting.


IMG_6835

Joke for today

A NEW JOKE EVERY DAY

Liam's Travels

Not all those who wander are lost

The Sharing Gardens

A Master Gardener from Northern New England moves to the Pacific Northwest. Here are accumulated gardening experiences encountered along the way.

Hot Saucers Ultimate

Hamilton College's Ultimate Frisbee Team

This Veggie Life

A Vegetarian | Nature Lifestyle Blog

A Transplanted Gardener

A Master Gardener from Northern New England moves to the Pacific Northwest. Here are accumulated gardening experiences encountered along the way.

Karen Whalen

A Writer Sharing Her One in a Million Journey with Adrenal Cancer

Camp Merrowvista

The official blog of Merrowvista summer camp

G Chek Flys!

My Photography and Aviation Interests

Storyshucker

A blog full of humorous and poignant observations.

Lyons Bonsai

A Novice Bonsai journey in Ireland

A Bridge to the Garden

Seminars for Gardeners about Gardening